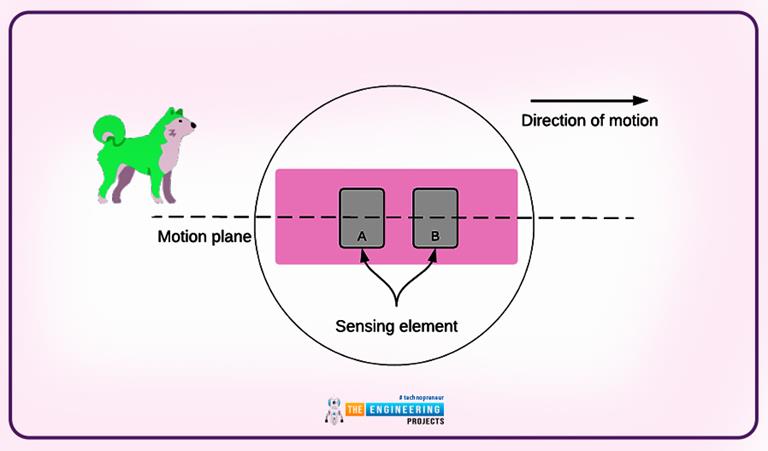
In this project were going to create a simple circuit with an Arduino Circuit Diagram PIR sensor: The PIR sensor stands for Passive Infrared sensor. It is a low cost sensor which can detect the presence of Human beings or animals. There are two important materials present in the sensor one is the pyroelectric crystal which can detect the heat signatures from a living organism (humans/animals) and the other is a Fresnel lenses which can widen the range of the sensor. Took me a little while to get started but I've managed to wire 2 PIR infrared sensors with an Arduino to sense motion either on the left or on the right side. The result will trigger an LED to represent each PIR sensor then I also added in a servo to be controlled - so it turns left when triggered by the left sensor and so on.. First have a look at my previous tutorial - Arduino PIR

PIR Sensor: The PIR sensor's output is monitored in the loop(). When motion is detected, it triggers the LED and publishes the data to the MQTT feed. Conclusion. By combining a PIR sensor with a NodeMCU, you can easily build a simple and effective motion detection system. This setup is ideal for security applications, automated lighting, and Arduino Motion Detection Simple Project: This is a very basic tutorial for Arduino beginners , we tried to keep it simple and to the point, how to use PIR motion detection sensors and how to control LED based on the sensor outpu. and so simply put,The main idea of this project is to light… 4) Another Simple PIR Based Alarm Circuit. The fourth idea below explains a simple PIR motion detector alarm circuit which can be used for activating lights or an alarm signal, only in the presence of a human or an intruder. How it Works. Here is a simple circuit that activates a relay alarm when a living being (a human) is detected by the PIR

PIR Motion Sensor Tutorial : 8 Steps (with Pictures) Circuit Diagram
Motion Detector Using PIR Sensor Working and Arduino Interface With Code and Connection: Hey! If you're attempting to make a basic motion sensor project with an Arduino and a PIR sensor, you're on the right site. Step 3: Simple Test of the Sensor. After all that setup, I use the code from the Arduino Project Hub tutorial to test whether the Connecting PIR sensors to a microcontroller is really simple. The PIR acts as a digital output so all you need to do is listen for the pin to flip high (detected) or low (not detected). Its likely that you'll want reriggering, so be sure to put the jumper in the H position! Power the PIR with 5V and connect ground to ground.

In this article, We will learn how can we make a Motion Detection System using Arduino. When the PIR Sensor will detect any motion, it will show that on the Serial Monitor and the buzzer will start. Components Required. Arduino UNO -> A microcontroller board based on the ATmega328P; PIR Sensor -> Which detects the motion When motion is detected, the sensor outputs a HIGH signal. This signal can be read by the Arduino, which in turn, activates the LED. How To Build the Arduino PIR Sensor Circuit. Set up the Arduino on your computer and connect the USB cable. Take the PIR sensor and connect it to the Arduino's 5V and GND for power. So TPA81 is a thermal camera with 8-pixel resolution, and of course, the Human body always emits heat. Now, If we control the PIR sensor by a controller and define some gesture for PIR sensor, we can make a simple gesture detector. In this project, We decided to make a gesture detector system using PIR and Arduino.