Digital Clinical Thermometer Circuit Diagram Make a Digital Thermometer: In this instructable, you will learn how to make a simple digital thermometer for under £10 using a few simple components and 1 IC. (I use hot glue just to secure the circuit board, switches, and thermistor in place)-Screwdriver (to adjust the potentiometers, unless you got the ones with knobs like mine, and to Circuit Diagram: Circuit diagram for Digital Thermometer Circuit using LM35 is given below:. Measuring Temperature with LM35 using 8051: 8051 microcontroller is a 8 bit microcontroller which has 128 bytes of on chip RAM , 4K bytes of on chip ROM, two timers, one serial port and four 8bit ports. 8052 microcontroller is an extension of microcontroller.. The table below shows the comparison of
.png?strip=all)
LM35DZ is capable of reading the temperature in Centigrade scale. The output voltage of the sensor is directly proportional to the temperature in centigrade. LM35 can be used in the range of -55°C to +150°C with +/- 0.75°C accuracy. So let's learn how to design a Digital Thermometer Using Arduino & LM35 Temperature Sensor. 2.4 primary and secondary thermometers 2.5 calibration of thermometers 2.6 review of two kinds of conventional thermometers . chapter three. 3.0 methodology. 3.1 system block diagram 3.2 components of the system. 3.3 system circuit diagram. 3.4 system working principle Circuit Design of Digital Thermometer. LM35 is the temperature sensor used in this project. The output of the sensor is directly proportional to the temperature but in analogue form. Hence, the output of LM35 i.e. pin 2 is connected to analog input A0 of Arduino.
Diode Digital Thermometer Circuit Circuit Diagram
Circuit digram for Digital Thermometer using Arduino and LM35 Temperature Sensor , is shown in the above figure. Make the connections carefully as shown in the schematic. Here 16x2 LCD unit is directly connected to arduino in 4-bit mode. Data pins of LCD namely RS, EN, D4, D5, D6, D7 are connected to arduino digital pin number 7, 6, 5, 4, 3, 2.

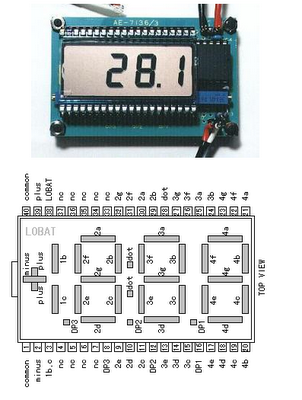
This digital thermometer circuit diagram uses a common 1N4148 diode as the temperature sensor. The temperature coefficient of the diode, -2 mV/°C is exploited for this application to create an accurate electronic thermometer. To display the measured temperature, a digital multimeter is used and so we can measure temperature values from -9.99 The wiring for this project is far simpler than you might imagine. Using the circuit diagram above, you can create your own DIY digital thermometer with little effort, but we've also broken the diagram down below to make it easier to follow. Wiring the DS18B20 Temperature Probe The entire circuit works off a 9V battery. Assemble the circuit on a general-purpose PCB and enclose in a small plastic box. Calibrate the thermometer using presets VR1 and VR2. After calibration, keep the box in the vicinity of the object whose temperature is to be measured. Sent by Mihail Dorutz, CH. Thanks a lot! Digital Thermometer Circuit
